December 6, 2013
November 19, 2013
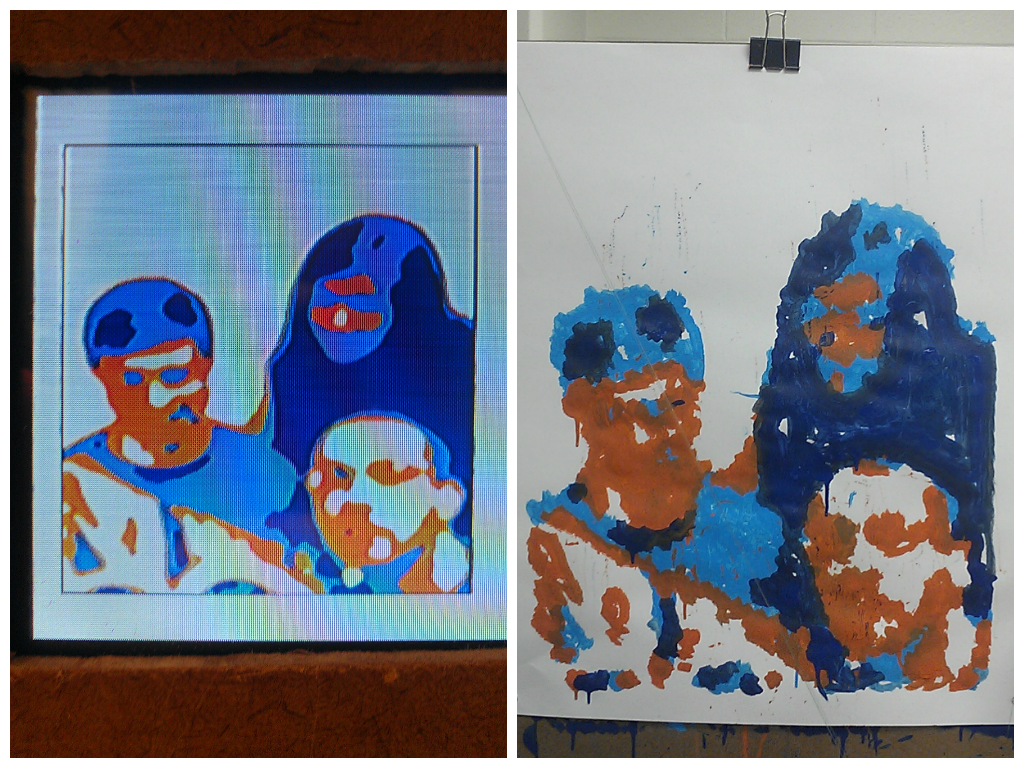
The PICASSAU team has been busy these past few days to wrap this project up. We've implemented all of the optimization ideas we came up with below (November 17, 2013). The results have been great! Below is another comparison picture, and below that is our demo video that shows the whole process.
November 17, 2013
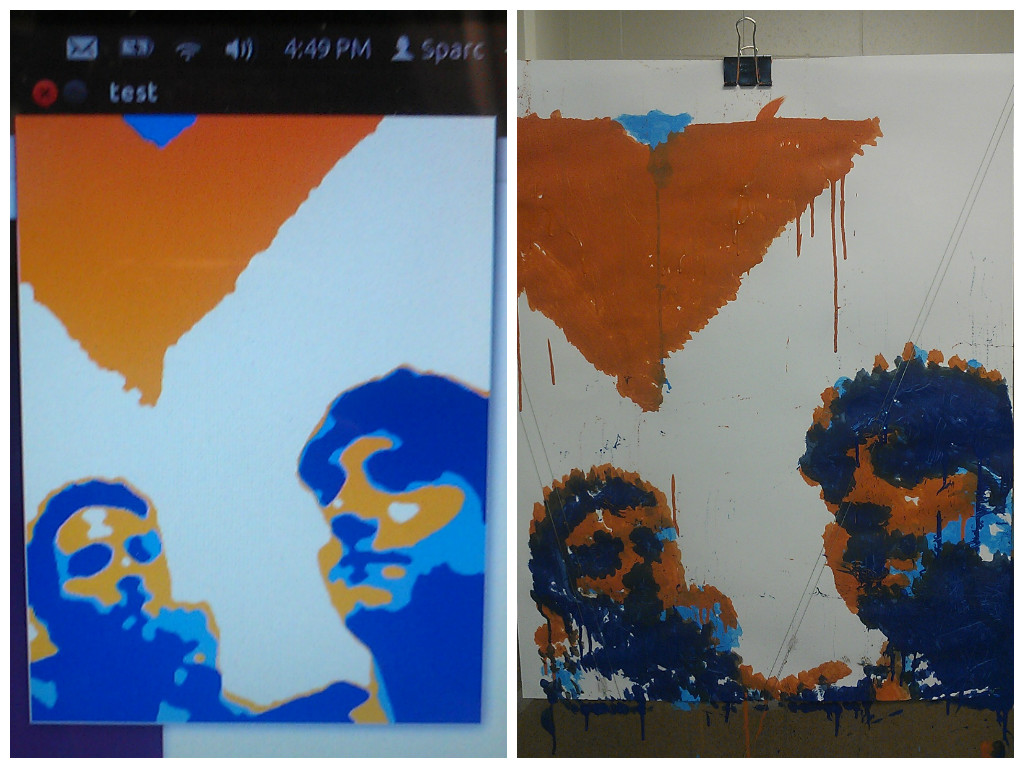
We ran our first full-scale test this week! We took a picture with the webcam, filtered it, vectorized it, and painted it all successfully. The image below shows the filtered image on the left and the painted image on the right. It came out great! Ben especially is easily recognized. Unfortunately, it took over two hours for PICASSAU to finish this painting. We have several ideas for improvements.
We definitely have our work cut out for us this week to finish the project!
- The paint had some large streaks where it was too thin. We are going to try to use less water next time.
- There are small streaks from where the arm dragged on the canvas. Additionally, in the bottom left corner where Drew's shoulder was incomplete, the arm was preventing the brush from reaching the canvas. We are going to modify the carriage so the arm can be raised higher.
- The kernel size was too small for the erosion, which is how PICASSAU fills in solid colors. This means that there was a lot of overlap when filling colors. Increasing the kernel size should noticably decrease the painting time.
- Another issue with the erosion was that any lines on the edges of the canvas were not eroded. This cost us a lot of time in for this painting. This is because erosion is performed by comparing the value of nearbly pixels, but this is not effective when a pixel is on the edge and has fewer neighboring pixels. The solution to this is to pad the outline of the binary images with a border of 0's. This will ensure that all shapes are eroded properly, and will decrease painting time.
- PICASSAU also painted slightly off the canvas on the bottom. We are going to decrease the canvas size to prevent this, and this should also help with decreasing painting time.
We definitely have our work cut out for us this week to finish the project!
November 12, 2013
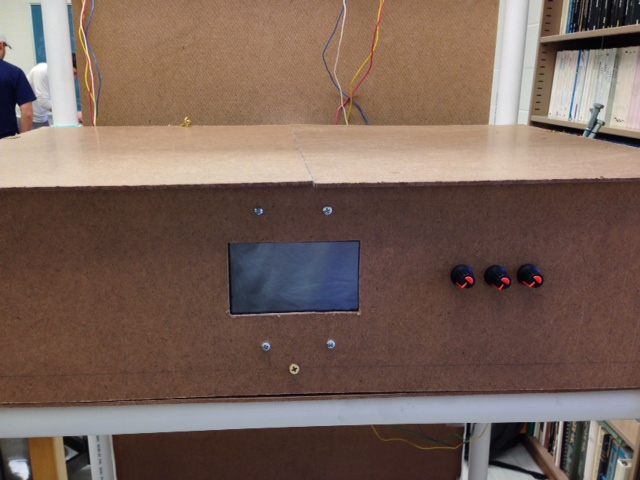
As we near the end of our project, we have been fine-tuning many aspects of our project to prepare it for the Senior Design Fair. We mounted the LCD screen that will display the image to be painted and integrated dials with it so the user can preview different color thresholds of their image. See the LCD mount below!
November 10, 2013
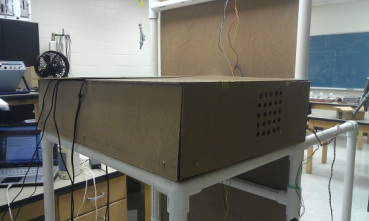
We've made some big changes in the last couple of weeks. The first big change is that we designed and created housing for our electronics shelf. This will keep our power supply, motor controllers, and microcontroller out of the open and hidden away. See the picture below.
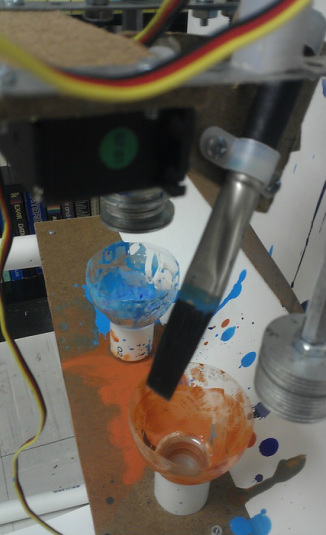
The next big change we made was using a different brush. Instead of the big sponge brush, we tested using a more traditional bristle brush. We really liked the results! The resulting painting has more artistic style. Surprisingly, this brush holds just as much paint as the sponge brush, so we can dip at the same interval as before. This brush is much easier to clean, so there is less bleeding between colors. Not only that, but this brush greatly reduced the dripping. The only issue with this brush is that it is thinner, so it will take longer to paint.
Also note that we switched the order of the colors. We decided that light blue should go first, since it is lighter than orange. See the pictures below for the paintbrush and the painting.
Also note that we switched the order of the colors. We decided that light blue should go first, since it is lighter than orange. See the pictures below for the paintbrush and the painting.
|
|
October 22, 2013
We noticed in testing that it took a significant amount of time to test PICASSAU by having it paint a full painting. This became a problem when we noticed there was an error in the SVG file mid-painting. To simulate what PICASSAU will paint, we again turned to the simulation tool, MATLAB.
We added a feature to the Python script to write the commands to a file in addition to sending them to the microcontroller. This file is read in by the MATLAB function and the paintbrush paths are simulated.
The first image below shows an example of an SVG file that had an error. By plotting the paths in MATLAB, we were able to identify the error in the file as opposed to in the Python script, embedded software, or the motors. The second image shows a simulation that was shown to be correct before painting it.
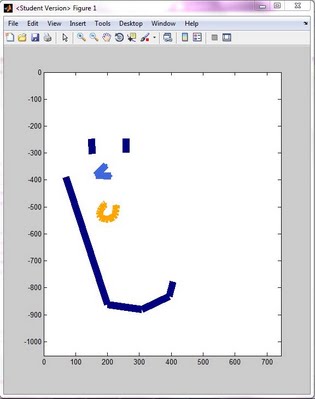
A MATLAB plot of a smiley face with an error in the SVG file
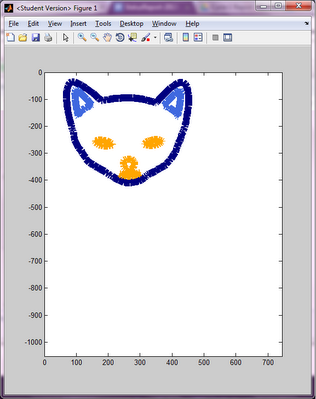
A MATLAB plot of a fox with no errors
October 8, 2013
Hey everyone! It is the end of cycle one and the team could not be happier with the progress that we have made on our project. Rather than bore you with the details of our accomplishments in this text box, I will show you with the following video. Enjoy!
October 5, 2013
After a lot of hard work fine tuning the calibration and dipping motions, we decided it was time to try actual painting. At first, we experimented with water, which shows an outline without being permanent like paint. Through these tests, we could tell that PICASSAU was drawing shapes reliably. However, whenever it begins to paint, lifting the brush to the canvas creates an unintended stroke. We switched to paint so we could see the actual effect of this. While painting, we also noticed we may need to dip more often, as the last third of the circle needed more paint. Below is a video of this first result, a painting of a circle.
It is encouraging to see that the calibration and actual strokes are reliable, and we are going to work to address the initial stroke problem in the near future.
It is encouraging to see that the calibration and actual strokes are reliable, and we are going to work to address the initial stroke problem in the near future.
october 5, 2013
The team has been working hard to master the calibration and dipping techniques. Now, if the carriage begins below the sensor, it will move up until it is seen by the sensor. Then, it will move left, towards the sensor, to calibrate. It then moves to dip into the center paint container. Finally, it returns to its previous position (which here is the calibration position near the sensor).
Note we have redesigned how the carriage is hung from the fishing line. To increase stability, we added standoffs to use the carriage's weight to hold it steady. We also added Erector set pieces in order to tie the fishing line closer to the center. We've been very pleased with the results!
Note we have redesigned how the carriage is hung from the fishing line. To increase stability, we added standoffs to use the carriage's weight to hold it steady. We also added Erector set pieces in order to tie the fishing line closer to the center. We've been very pleased with the results!
September 30, 2013
It's been a busy week for the PICASSAU team.
- We finally got our new motors in! They are much stronger (and heavier) than our previous motors. Plus, they have twice as many steps, which means more precise brush control! We plan to have the mounting finished and begin testing by the end of this work week. We've also developed some new spools for the fishing wire made out of ribbon spools.
- We loaded Raspbian onto an SD card and booted up the Raspberry Pi for the first time. We also installed necessary python utilities (numpy, opencv, etc.) so we can start using the Pi instead of a laptop for future development.
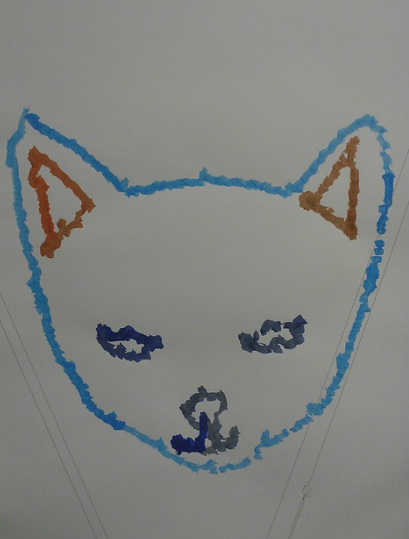
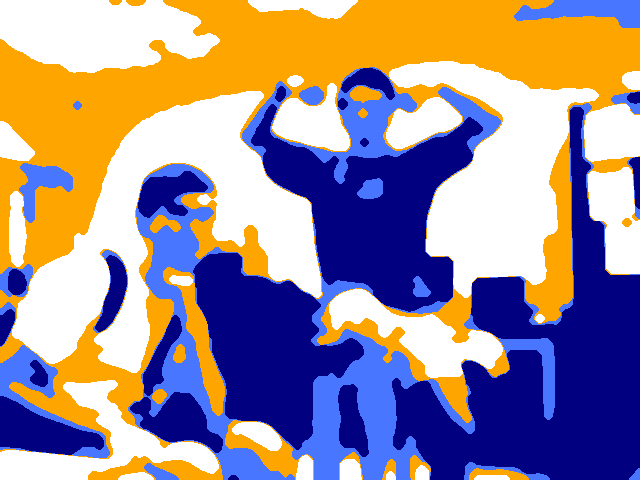
- We also implemented the coloring system for our filtered images. The filtered images are four colors. One will be the background and the remaining three represent our three colors of paint. We plan our three colors to be dark blue, light blue, and orange. Check out the example below and our updated "About the Team" page.
september 24, 2013
At the moment, we are fine-tuning our calibration and paint dipping techniques. We are using an IR sensor on the side of the phsyical mount to determine the position of the painting carriage and to create a consistent starting point for each painting. In addition, we are working on dipping the paintbrush into the paint in the paint tray. Check out the video to see PICASSAU in action!
September 17, 2013
So our eventual goal with PICASSAU is to be able to take a picture of someone, filter it done to just a few colors, and then paint it.
We've been working on figuring out how to do the filtering to get an image into something paintable. Today we finally got enough working to get some good looking results. Here's some of the pictures we took of ourselves. Right now they're in grayscale, but when it's actually painted, each level of gray will be a different paint color (and the white will just be the plain canvas background).
We've been working on figuring out how to do the filtering to get an image into something paintable. Today we finally got enough working to get some good looking results. Here's some of the pictures we took of ourselves. Right now they're in grayscale, but when it's actually painted, each level of gray will be a different paint color (and the white will just be the plain canvas background).
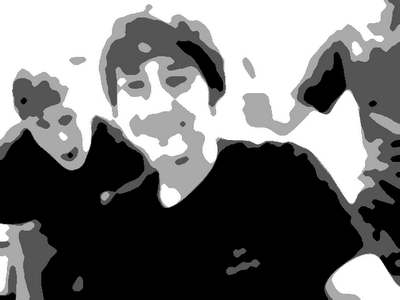
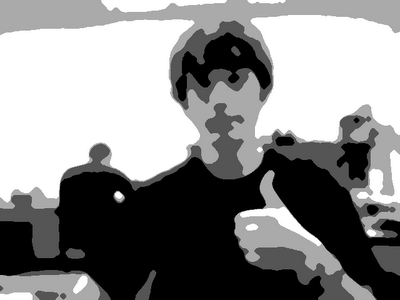
For those wondering about the details, here's how we filtered it:
1. Convert to grayscale.
2. Run a median filter on it.
3. Convert each pixel to one of four different intensity levels (0, 85, 170, or 255) based on some user-controllable thresholds.
4. Run a "closing" morphological filter on it. This is equivalent to a dilation filter followed by an erosion filter. What this does is get rid of an small white features in the image (features that would be too small to paint).
5. Run an "opening" morphological filter. This is an erosion followed by a dilation. It does basically the same thing as the "closing" filter, but to black features instead of white.
September 7, 2013
So as you could probably tell from our first video, PICASSAU had a little trouble doing what it was told. Specifically, there was some issue with the way it was plotting, or moving from one coordinate to the next. To help figure out what was wrong with our plotting, we made a MATLAB simulation of our plotting algorithm to rule out any hardware issues.
Interestingly, we found that the simulation made the same weird errors that our physical robot made. Below is the simulation result of trying to move in a straight line from one single point to another.
Interestingly, we found that the simulation made the same weird errors that our physical robot made. Below is the simulation result of trying to move in a straight line from one single point to another.
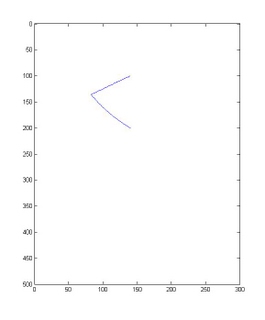
Clearly not a straight line. Anyway, with a little bit of trial and error, we were able to track down the issue to a bit of faulty math. After correcting the issue, here's the simulation of the exact same movement, but with the error fixed this time.
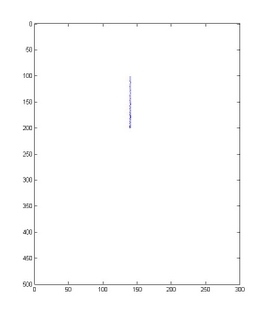
Much better. The slight jaggedness that you see there is due to the resolution of the discrete motor steps. If that turns out to be too jagged, there are some things we can do to fix it, such as using higher resolution stepper motors or smaller spindles.
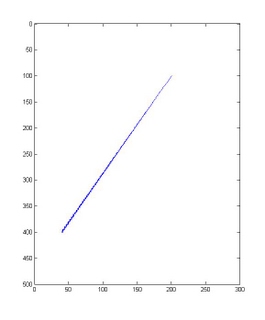
Lastly, just to get something slightly more interesting than a plain vertical line, here's a simulation of a diagonal line with the fixed plotting algorithm.
Lastly, just to get something slightly more interesting than a plain vertical line, here's a simulation of a diagonal line with the fixed plotting algorithm.
September 4, 2013
Here's a short video of our initial prototype! It's coming along pretty well. We've got it reading from a vector graphics file on the computer and transmitting coordinates to the Arduino to drive the motors. For this video, we wet the brush beforehand so that you could see where it tries to paint.
It was supposed to draw a circle there, so clearly we still have plenty of bugs to work out, but for an early model, it really gets the idea across.
